The way a surface looks says a lot about how it’s been handled. Scratches, scuffs, or leftover residue often go unnoticed—until it’s too late. That’s why self-adhesive films are used—to keep surfaces safe from the start. They’re more than just protective layers—they’re silent guardians. But here’s the catch: if not applied or removed correctly, they can do more harm than good.
As per industry analysis, the demand for surface protection films is expected to rise significantly, with the market estimated to reach around USD 1.9 billion by 2026. This growth is in sectors such as construction, electronics, and packaging. However, despite their growing popularity, many users still struggle with common issues like air bubbles, sticky residues, or surface scratches during application or removal.
That’s why we are here—to help you do it the right way. When your goal is to protect a surface, how you apply and remove the film matters just as much as the film itself.
What Is Self-Adhesive Film? (And Why It Matters)
Self-adhesive film is a thin, flexible sheet with a pressure-sensitive adhesive on one side. It sticks to surfaces—without the need for glue—and offers temporary or long-term protection.

Key Uses:
- Surface protection during transport or installation
- Temporary branding or decoration
- UV, dust, and scratch protection
- Interior applications (like countertops, cabinets, etc.)
It’s commonly used on glass, aluminum, laminates, plastic sheets, metal panels, and more.
What makes it unique?
1. Easy to apply
2. Leaves no residue
3. Flexible and customizable
4. Comes in multiple finishes and thicknesses
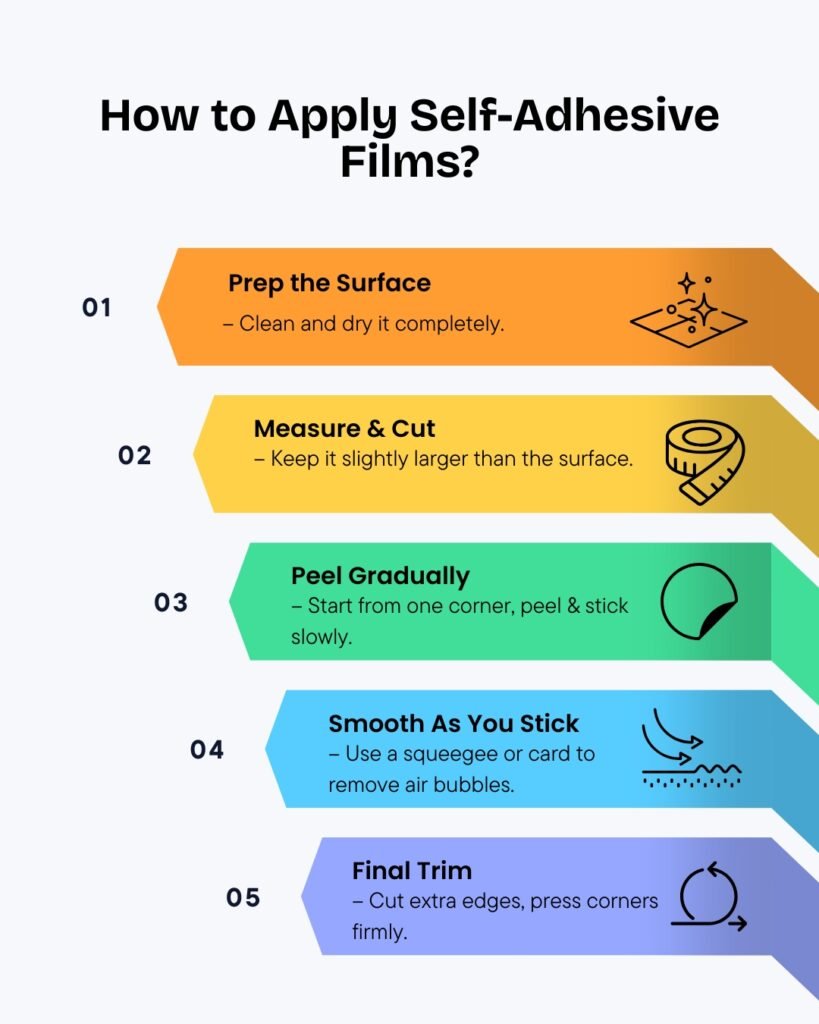
How to Apply Self-Adhesive Film: Step-by-Step
Follow these steps to make sure your film sits perfectly—and stays that way:
Step 1: Prep the Surface
- Wipe the surface using a soft, dry, lint-free cloth.
- Use mild soap and water if needed—then dry it completely.
- Avoid oils, dust, or moisture, as they cause bubbles or poor adhesion.
Step 2: Measure and Cut
- Measure your surface area with precision.
- Cut the film slightly larger than needed—so you can trim later.
- Use a sharp cutter or scissors for neat edges.
Step 3: Peel Gradually
- Start from one corner and peel back 2–3 inches of the liner.
- Position the edge of the film carefully along the starting side of your surface to ensure accurate alignment.
- Stick it gently while peeling more of the liner as you go.
Step 4: Smooth As You Stick
- Use a squeegee, ruler, or card (wrapped in cloth) to smooth the film.
- Push air out from the center toward the edges.
- Work slowly to avoid wrinkles.
Step 5: Final Trim
- Once fully applied, trim the extra edges with a blade or knife.
- Press down the corners firmly for a clean finish.
How to Remove Self-Adhesive Film Without Damage
Here’s how to take it off cleanly, without leaving behind residue or harming the surface:
- Start at one corner—gently lift and pull at a slow, consistent angle.
- Use mild heat—A hairdryer or heat gun on a low setting helps loosen old adhesive. Avoid sharp tools—never scrape the surface with knives or blades.
- Use rubbing alcohol—To clean leftover glue, dab a soft cloth in isopropyl alcohol and wipe gently.
- Apply even pressure—don’t yank or tug. It can stretch the film or damage paint/laminates.
- Work in a dust-free space—Dirt can stick to the adhesive during removal, making the process harder.
Conclusion
Protection film isn’t just about covering up—it’s about doing things right from the beginning to the end. Self-adhesive films are designed to protect the surfaces. But the real value shows when they’re applied with care and removed without leaving a trace.
Take time.
Be precise.
Follow the above tips.